如何在ASP.NET 2.0中自定义DataList编辑界面?
导言
DataList的编辑界面由EditItemTemplate里的标记语言和web控件定义。在目前为止所做的DataList编辑功能的例子里,编辑界面都只包含TextBox。在前面一章里,我们通过添加验证控件来增加了用户体验,提高了可用性。
EditItemTemplate可以包含除了TextBox以外的很多控件,比如DropDownList, RadioButtonList, Calendar等。和使用TextBox一样,使用这些控件自定义编辑界面时,步骤如下:
为EditItemTemplate添加控件.
使用绑定语法将相关的字段值赋给控件的属性.
在UpdateCommand事件处理里, 编程访问web控件的值,并将它传给相关的BLL的方法.
本章我们将为DataList创建一个更丰富的编辑界面,它将包含DropDownList和CheckBox。我们将创建一个列出product信息的DataList,用户可以更新它的name,supplier,category和discontinued status。见图1。

图 1: 编辑界面包含一个TextBox, 两个 DropDownLists和一个CheckBox
第一步: 显示Product 信息
在创建DataList的编辑界面前,我们需要先创建一个只读界面。先打开EditDeleteDataList文件夹下的CustomizedUI.aspx页,拖一个DataList进来,将ID设为Products。通过DataList的智能标签,创建一个名为ProductsDataSource的ObjectDataSource,用ProductsBLL类的GetProducts方法配置它。象前面一章一样,我们将直接通过BLL来更新product信息。在UPDATE,INSERT,DELETE标签里选择None.
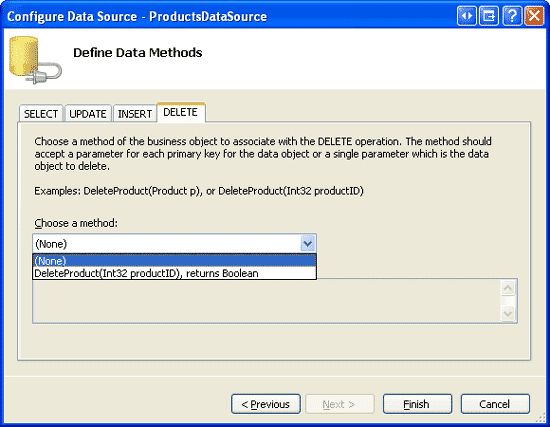
图 2: 在UPDATE, INSERT, DELETE 标签的下拉列表里选择 (None)
配置完ObjectDataSource后,Visual Studio会自动创建默认的ItemTemplate,列出每个字段的值。将product name用<h4>表示,并添加一个Edit button,确保将它的CommandName属性设为 “Edit”. 我的标记语言如下:
<ItemTemplate>
 <h4>
 <asp:Label ID="ProductNameLabel" runat="server"
  Text='<%# Eval("ProductName") %>' />
 </h4>
 <table border="0">
 <tr>
  <td class="ProductPropertyLabel">Category:</td>
  <td class="ProductPropertyValue">
  <asp:Label ID="CategoryNameLabel" runat="server"
   Text='<%# Eval("CategoryName") %>' />
  </td>
  <td class="ProductPropertyLabel">Supplier:</td>
  <td class="ProductPropertyValue">
  <asp:Label ID="SupplierNameLabel" runat="server"
   Text='<%# Eval("SupplierName") %>' />
  </td>
 </tr>
 <tr>
  <td class="ProductPropertyLabel">Discontinued:</td>
  <td class="ProductPropertyValue">
  <asp:Label ID="DiscontinuedLabel" runat="server"
   Text='<%# Eval("Discontinued") %>' />
  </td>
  <td class="ProductPropertyLabel">Price:</td>
  <td class="ProductPropertyValue">
  <asp:Label ID="UnitPriceLabel" runat="server"
   Text='<%# Eval("UnitPrice", "{0:C}") %>' />
  </td>
 </tr>
 <tr>
  <td colspan="4">
  <asp:Button runat="Server" ID="EditButton"
   Text="Edit" CommandName="Edit" />
  </td>
 </tr>
 </table>
 <br />
</ItemTemplate>
上面的标记语言用<h4>表示product name,4列的<table>展示其它字段。前面已经讨论过Styles.css里定义的ProductPropertyLabel和productPropertyValue类。浏览该页,见图3。
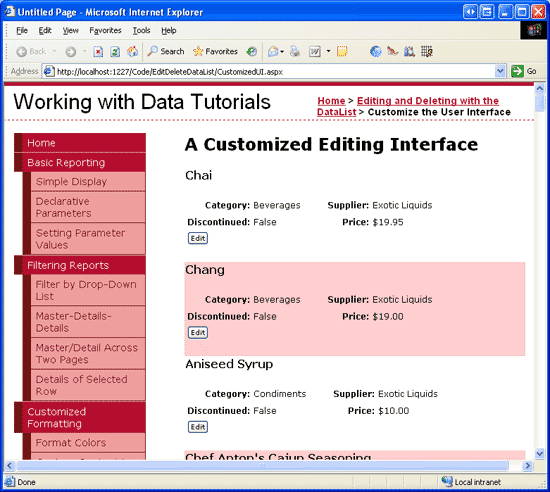
图 3: 显示product信息
第二步: 为编辑界面添加web控件
首先向EditItemTemplate里添加需要的web控件。我们需要用一个DropDownList表示category,一个DropDownList表示supplier,一个CheckBox 表示discontinued state。由于本例中不用编辑price,所以仍然用Label来表示它。
点击DataList的智能标签上的“Edit Templates”,选择EditItemTemplate,为它添加一个ID为Categories的EditItemTemplate。
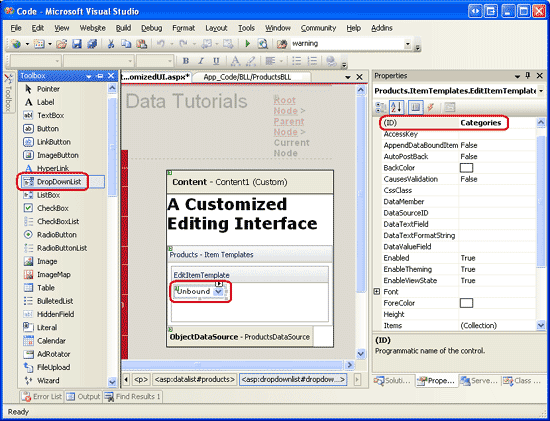
图 4: 为Categories添加一个DropDownList
然后从DropDownList的智能标签里选择“Choose Data Source”,创建一个名为CategoriesDataSource的ObjectDataSource。用CategoriesBLL类的GetCategories()方法配制它(见图5)。数据源配置向导会要求为ListItem Text和Value选择字段。让DropDownList 显示CategoryName,CategoryID作为Value,见图6。
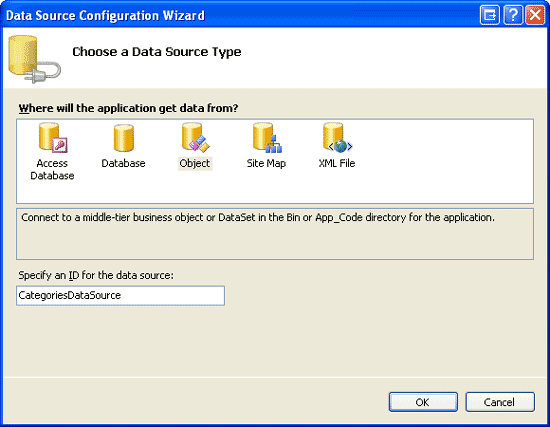
图 5: 创建 ObjectDataSource
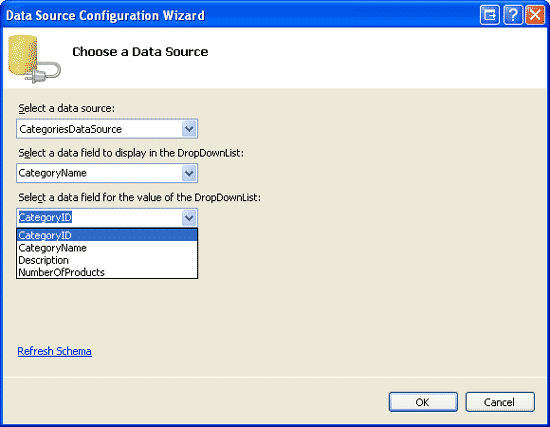
图 6: 配置DropDownList的 Display 字段和Value 字段
重复上面的步骤,为suppliers创建一个ID为Suppliers的DropDownList 和一个名为SuppliersDataSource的ObjectDataSource。
然后为discontinued state 添加一个CheckBox ,为name添加一个TextBox 。将他们的ID分别设为Discontinued和ProductName。为product name添加一个RequiredFieldValidator 确保用户必须提供这个值。
最后添加Update 和Cancel button。记得这两个button的CommandName属性必须分别设为“Update” 和“Cancel”。你可以将编辑界面以你喜欢的方式展示。我选择使用和只读界面一样的界面来显示,见下面的声明代码和截图。
<EditItemTemplate>
 <h4>
 <asp:Label ID="ProductNameLabel" runat="server"
  Text='<%# Eval("ProductName") %>' />
 </h4>
 <table border="0">
 <tr>
  <td class="ProductPropertyLabel">Name:</td>
  <td colspan="3" class="ProductPropertyValue">
  <asp:TextBox runat="server" ID="ProductName" Width="90%" />
  <asp:RequiredFieldValidator ID="RequiredFieldValidator1"
   ControlToValidate="ProductName"
   ErrorMessage="You must enter a name for the product."
   runat="server">*</asp:RequiredFieldValidator>
  </td>
 </tr>
 <tr>
  <td class="ProductPropertyLabel">Category:</td>
  <td class="ProductPropertyValue">
  <asp:DropDownList ID="Categories" runat="server"
   DataSourceID="CategoriesDataSource"
   DataTextField="CategoryName" DataValueField="CategoryID" />
  </td>
  <td class="ProductPropertyLabel">Supplier:</td>
  <td class="ProductPropertyValue">
  <asp:DropDownList ID="Suppliers" DataTextField="CompanyName"
   DataSourceID="SuppliersDataSource"
   DataValueField="SupplierID" runat="server" />
  </td>
 </tr>
 <tr>
  <td class="ProductPropertyLabel">Discontinued:</td>
  <td class="ProductPropertyValue">
  <asp:CheckBox runat="server" id="Discontinued" />
  </td>
  <td class="ProductPropertyLabel">Price:</td>
  <td class="ProductPropertyValue">
  <asp:Label ID="UnitPriceLabel" runat="server"
   Text='<%# Eval("UnitPrice", "{0:C}") %>' />
  </td>
 </tr>
 <tr>
  <td colspan="4">
  <asp:Button runat="Server" ID="UpdateButton" CommandName="Update"
   Text="Update" />

  <asp:Button runat="Server" ID="CancelButton" CommandName="Cancel"
   Text="Cancel" CausesValidation="False" />
  </td>
 </tr>
 </table>
 <br />
 <asp:ObjectDataSource ID="CategoriesDataSource" runat="server"
 OldValuesParameterFormatString="original_{0}" SelectMethod="GetCategories"
 TypeName="CategoriesBLL">
 </asp:ObjectDataSource>
 <asp:ObjectDataSource ID="SuppliersDataSource" runat="server"
 OldValuesParameterFormatString="original_{0}" SelectMethod="GetSuppliers"
 TypeName="SuppliersBLL">
 </asp:ObjectDataSource>
</EditItemTemplate>
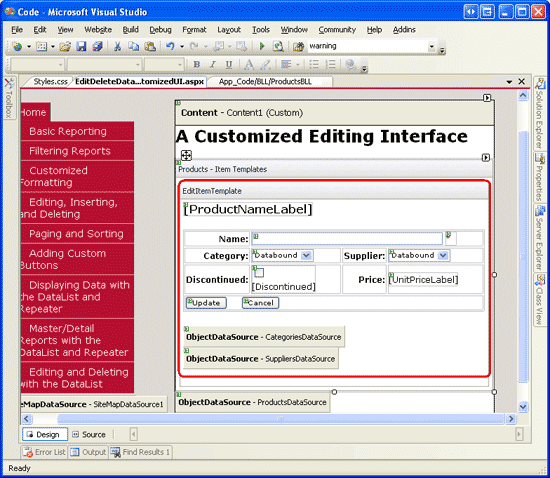
图 7: 编辑界面和只读界面的展示差不多
第三步: 创建 EditCommand和CancelCommand Event Handlers
现在在EditItemTemplate里除了UnitPriceLabel外还没有绑定语法(从ItemTemplate复制过来的代码)。在添加绑定语法前我们首先为DataList的EditCommand和CancelCommand创建事件处理。EditCommand事件处理的目标是为了将Edit button被点击的item展示为编辑状态,而CancelCommand的目标是将DataList返回到编辑前状态。见下面的代码:
protected void Products_EditCommand(object source, DataListCommandEventArgs e)
{
 // Set the DataList's EditItemIndex property and rebind the data
 Products.EditItemIndex = e.Item.ItemIndex;
 Products.DataBind();
}
protected void Products_CancelCommand(object source, DataListCommandEventArgs e)
{
 // Return to DataList to its pre-editing state
 Products.EditItemIndex = -1;
 Products.DataBind();
}
完成这些后,点击Edit button会进入编辑界面,点击Cancel button会返回只读模式。见图8。由于现在还没有为编辑界面添加绑定语法,TextBox是空白的,CheckBox 未被选中,两个DropDownList里都是第一个item被选中。
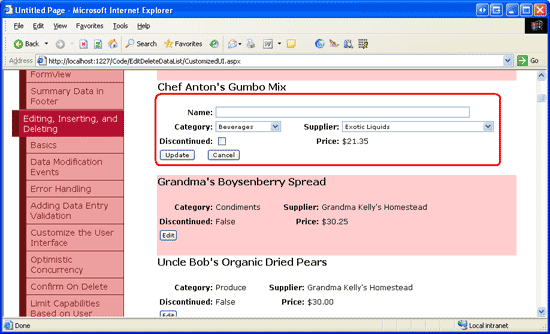
图 8: 点击Edit Button显示编辑界面
第四步: 为编辑界面增加绑定语法
为了让编辑界面显示当前product的值,我们需要使用绑定语法将字段的值赋给web控件。绑定语法可以通过选择web控件的智能标签的“Edit DataBindings”或者直接添加声明语法来实现。
将ProductName字段的值赋给ProductName TextBox的Text属性,CategoryID和SupplierID字段赋给Categories和Suppliers DropDownList的SelectedValue属性,Discontinued字段赋给Discontinued CheckBox的Checked属性。完成这些后,浏览页面并点击Edit button.见图9。

图 9: 点击Edit Button 显示编辑界面
第五步: 在UpdateCommand Event Handler保存用户的更改
当用户编辑product并点Update button后,会postback并激发UpdateCommand事件。在事件处理里,我们需要从EditItemTemplate里读出web控件的值,并和BLL交互,然后更新数据库里的product。如我们在前面一章看到的那样,被更新的product的ProductID可以通过DataKeys集合来获龋用户输入的值可以通过FindControl("controlID")来编程获取,见下面的代码:
protected void Products_UpdateCommand(object source, DataListCommandEventArgs e)
{
 // Make sure the page is valid...
 if (!Page.IsValid)
 return;
 // Read in the ProductID from the DataKeys collection
 int productID = Convert.ToInt32(Products.DataKeys[e.Item.ItemIndex]);
 // Read in the product name and price values
 TextBox productName = (TextBox)e.Item.FindControl("ProductName");
 DropDownList categories = (DropDownList)e.Item.FindControl("Categories");
 DropDownList suppliers = (DropDownList)e.Item.FindControl("Suppliers");
 CheckBox discontinued = (CheckBox)e.Item.FindControl("Discontinued");
 string productNameValue = null;
 if (productName.Text.Trim().Length > 0)
 productNameValue = productName.Text.Trim();
 int categoryIDValue = Convert.ToInt32(categories.SelectedValue);
 int supplierIDValue = Convert.ToInt32(suppliers.SelectedValue);
 bool discontinuedValue = discontinued.Checked;
 // Call the ProductsBLL's UpdateProduct method...
 ProductsBLL productsAPI = new ProductsBLL();
 productsAPI.UpdateProduct(productNameValue, categoryIDValue, supplierIDValue,
    discontinuedValue, productID);
 // Revert the DataList back to its pre-editing state
 Products.EditItemIndex = -1;
 Products.DataBind();
}
代码首先检查Page.IsValid属性来确保所有的验证控件都返回合法值。如果Page.IsValid为True,从DataKeys集合里读出被编辑的product 的ProductID的值,并引用EditItemTemplate里的web控件。然后将这些控件的值读到变量里,并传给UpdateProduct方法。完成更新后,DataList会返回到编辑前的状态。
注意:我省略了某章异常处理,目的是为了使本章的代码看起来目的性更强。你可以在完成本章后自己添加异常处理的功能作为练习。
第六步: 处理空的CategoryID 和SupplierID 值
Northwind 数据库允许Products表里的CategoryID和SupplierID列为空。然而我们的编辑界面目前还没有提供可选空值。如果我们试图编辑一个无论是CategoryID还是SupplierID为空的product,将会产生ArgumentOutOfRangeException异常。目前我们也没有将product的category或supplier的值从一个非空值转换为空值的方法。
为了在DropDownLists里添加空值,我们需要添加一个ListItem。我将ListItem里的Text显示为"(None)",你可以将它赋为任何你希望的值(比如空字符串)。最后,记得将DropDownLists的AppendDataBoundItems设为True。如果你没有这么做,绑定到DropDownList 的categories 和suppliers 会被添加的ListItem覆盖。完成这些后,DropDownLists的标记语言看起来应该和下面差不多:
<asp:DropDownList ID="Categories" DataSourceID="CategoriesDataSource"
 DataTextField="CategoryName" DataValueField="CategoryID" runat="server"
 SelectedValue='<%# Eval("CategoryID") %>' AppendDataBoundItems="True">
 <asp:ListItem Value=" Selected="True">(None)</asp:ListItem>
</asp:DropDownList>
...
<asp:DropDownList ID="Suppliers" DataSourceID="SuppliersDataSource"
 DataTextField="CompanyName" DataValueField="SupplierID" runat="server"
 SelectedValue='<%# Eval("SupplierID") %>' AppendDataBoundItems="True">
 <asp:ListItem Value=" Selected="True">(None)</asp:ListItem>
</asp:DropDownList>
注意:为DropDownList 添加ListItems可以通过设计器或者声明语法来完成。当添加一个表示数据库空值的item时,要确保是通过声明语法来完成的。如果你使用设计器的ListItem集合编辑器,当赋空字符串时,产生的声明语法会忽略Value的设置,产生想<asp:ListItem>(None)</asp:ListItem>这样的语句。这个看起来并没有什么关系,但是缺少Value会让DropDownList 使用Text属性的值作为Value。这意味着当NULL ListItem被选择时,“(None)” 会被赋给product的CategoryID或SupplierID字段,这会引起异常。而显式的将Value设为“”,当NULL ListItem被选择时一个空值会被赋给product的CategoryID或SupplierID字段。现在浏览该页。当编辑product时,注意Categories和Suppliers DropDownLists 开头都包含一个“(None)”选项。
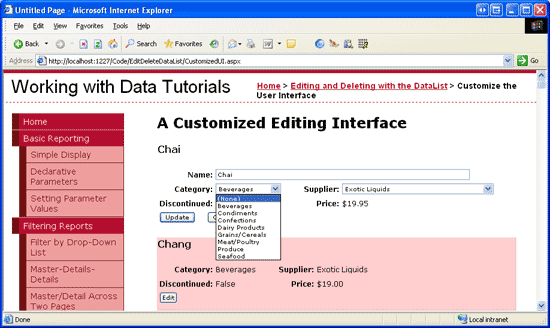
图 10: Categories 和Suppliers DropDownLists包含 “(None)”
为了将“(None)” 保存为数据库NULL值,我们需要回到UpdateCommand事件处理。将categoryIDValue和supplierIDValue变量设为可为空的整型,并在DropDownList的SelectedValue的值不为空字符串时才为它们赋值。
int? categoryIDValue = null;
if (!string.IsNullOrEmpty(categories.SelectedValue))
 categoryIDValue = Convert.ToInt32(categories.SelectedValue);
int? supplierIDValue = null;
if (!string.IsNullOrEmpty(suppliers.SelectedValue))
 supplierIDValue = Convert.ToInt32(suppliers.SelectedValue);
完成这个后,如果用户在DropDownList里选择“(None)” 时,一个空值将被传给UpdateProduct BLL方法,它相当于数据库的NULL值。
总结
本章我们学习了如何为DataList创建一个更复杂的编辑界面,它包含三种不同的web控件— 一个TextBox,两个DropDownLists和一个CheckBox —并且包含验证控件。当创建编辑界面时,不管使用什么控件,步骤都是一样的:先为EditItemTemplate添加控件;将字段值通过绑定语法赋给对应的web控件的属性;在UpdateCommand事件处理中编程访问web控件和它们的属性,并将值传给BLL。
当创建编辑界面时,无论它仅仅是由TextBox组成还是由不同的web控件组成,要确保正确的处理数据库NULL值。当处理NULL时,不仅需要在编辑界面正确显示已经存在的NULL值,还需要提供输入NULL值的方法。对DataLists里的DropDownLists 来说,这通常意味着需要添加一个Value属性被显式设为空字符串(Value="")的ListItem,然后在UpdateCommand事件处理里判断NULL ListItem是否被选中。
祝编程快乐!
作者简介
本系列教程作者 Scott Mitchell,著有六本ASP/ASP.NET方面的书,是4GuysFromRolla.com的创始人,自1998年以来一直应用 微软Web技术。
本文地址:http://www.45fan.com/bcdm/82428.html