��avalon js��ʵ�ַ�google plusͼƬ�����϶�����IJ���
Դ�����أ�http://xiazai.jb51.net/201509/yuanma/drag_sort1(jb51.net).rar
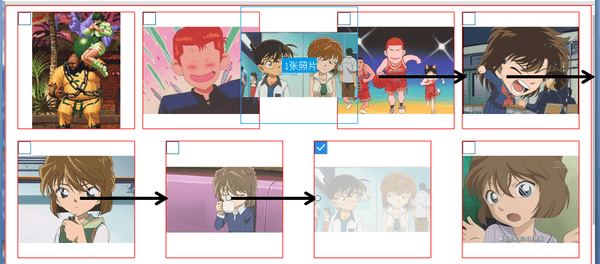
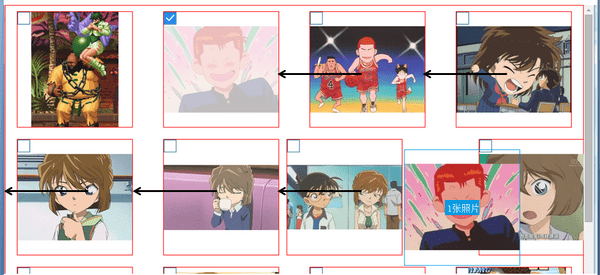
Ч��չʾ���£�
google plus
�϶�+��ӦʽЧ����

Ҫ��
1. ���߶��벼�֣���ͼƬ����һ�£����������ߵ�ͼƬ��߽�ļ�һ������ͼƬ���࣬����ie7,8,firefox,chrome.
2. ������ߴ�仯���ڴ���һ���ߴ�ʱ��ÿ���Զ����ӻ����ͼƬ,�Զ�����ͼƬ���࣬���������߶��벼�֣���ʱÿ��ͼƬ�ߴ�̶���������200*200px������С��һ���ߴ�ʱ��ÿ��ͼƬ�����̶���������С������3������ʱͼƬ���ǵȱ�����������š�
3. �������ͬ�ߴ��£���Ȼ�����϶�����
4. ͼƬ���϶��������ͼƬʼ�ձ��ֵȱ�����ˮƽ��ֱ���С�
5. �϶�����Ӧλ��ʱ��λ�����ҵ�ͼƬ����һ��ƫ�ơ��������������ұߣ���ֻ�Ǹ��еĵ�һ��ͼƬ�����һ��ͼƬ����ƫ�ơ�
6. ֧�ֶ���ͼƬ�϶�����
ʵ��
���ּ�css
 <div id='wrap'>
 <ul class='justify'>
  <li>
  <a href="javascript:;" class="no_selected"></a>
  <div class='photo_mask'></div>
  <div>
   <div class="dummy"></div>
   <p><img><i></i></p>
  </div>
  </li>
  <li class='justify_fix'></li>
 </ul>
 </div>
inline-block+flex-box+text-align:justify
����Ҫ���ݵͰ汾������������б�li�����õ���inline-block.�����߶��벼��
-�Ͱ汾��inline-block+`text-align:justify`
-�ִ���inline-block+`flex-box`
����μ����ŵ�ģ��flexbox justify-content��space-between
����û����flex-box��`align-content:space-around`����Ϊ��ͨ��`text-align:justify`���ݵͰ汾�������
`text-align:justify`��������ߣ����ұ������Զ�������box�ߵļ�ࡣ��ʹ������box����padidng,���磺
li{
 margin:0 1%;
 ...
}
#wrap{
 padding:0 1%;
}
����������������ߣ����ұ���box�߽�ļ���li֮��ļ��һ��������2%�ˡ�ʵ���ϣ�����box���õ�padding����Զ�����ģ���li֮���margin������֮�������Сֵ���������li֮��ļ���1%,��ʱ��һ������Ȼ�ж���Ŀհף���Щli��ѿհ����ˣ���ʱ����֮��ļ������1%.
�����ʵ��
li{
 list-style-type: none;
 display:inline-block;
 *display: inline;
 zoom:1;
 max-width: 200px;
 max-height: 200px;
 width: 28%;
 border:1px solid red;
 position: relative;
 overflow: hidden;
 margin:10px 2%;
}
li[class='justify_fix']{
 border:none;
}
.justify {
 display: flex;
 align-items: flex-start;
 flex-flow: row wrap;
 justify-content: space-between;
 text-align: justify;
 text-justify: inter-ideograph;
 *zoom: 1;
 -moz-text-align-last: justify;
 -webkit-text-align-last: justify;
 text-align-last: justify;
}
@media (-webkit-min-device-pixel-ratio:0) {
 .justify:after {
 content: "";
 display: inline-block;
 width: 100%;
 }
}
����Ҫ����`max-width`,`max-height`.������Կ�����Ԫ�����涼�ǰٷֱȣ���Ҫ�����������ߴ硣
ͼƬ��Ӧʽ+ˮƽ��ֱ����
����μ����ŵ�cssͼƬ��Ӧʽ+��ֱˮƽ����
ѡ��ͼƬ
google plus�ǰ�סctrl,���ͼƬ����ɶ�ѡ�������ǵ��"����"�������`<a class='no_selected'></a>`����
����ѵ�ǰͼƬ��index��������ѡ��ͼƬindex������(�����selected_index)�������index�����ڣ������ӣ��Ѵ��ڣ���ɾ������"����"��ʱ�����������Ƿ���ڸ�index������ʽ��
<div id='wrap' ms-controller='photo_sort'>
<ul class='justify'>
<li ms-repeat='photo_list'>
<a href="javascript:;" class="no_selected" ms-class-selected_icon='selected_index.indexOf($index)>-1' ms-click='select($index)'></a>
...
</li>
<li class='justify_fix'></li>
</ul>
</div>
var photo_sort=avalon.define({
selected_index:[],//ѡ��ͼƬ��index�б�,
...
select:function(i){
var selected_index=photo_sort.selected_index;
if(selected_index.indexOf(i)==-1)//ѡ��ͼƬ��index�б������ڣ�����
photo_sort.selected_index.ensure(i);
else
photo_sort.selected_index.remove(i);
}
});
mousedown
�����������ֲ�,���������mousedown�¼���
<a href="javascript:;" class="no_selected" ms-class-selected_icon='selected_index.indexOf($index)>-1' ms-click='select($index)'></a>
<div class='photo_mask' ms-mousedown='start_drag($event,$index)'></div>
var photo_sort=avalon.define({
$id:'photo_sort',
photo_list:[],//ͼƬ�б�
selected_index:[],//ѡ��ͼƬ��index�б�
drag_flag:false,
sort_array:[],//��Χ�б�,
cell_size:0,//ÿ����Ԫ��ߴ磬������߱�Ϊ1
target_index:-1,//����Ŀ��λ�õ�index
col_num:0,//����
x_index:-1,//��ǰ�϶�λ�õ�x����index
...
});
start_drag:function(e,index){
if(photo_sort.selected_index.size()){//��ѡ�е�ͼƬ
photo_sort.target_index=index;//�����û�û���϶�ͼƬ���������ͼƬ������Ĭ��Ŀ�꼴��ǰ���ͼƬ
photo_sort.cell_size=this.clientWidth;
var xx=e.clientX-photo_sort.cell_size/2,yy=e.clientY-photo_sort.cell_size/2;//����ͼƬ�����ô���λ���Ե����Ϊ����
$('drag_proxy').style.top=yy+avalon(window).scrollTop()+'px';
$('drag_proxy').style.left=xx+'px';
$('drag_proxy').style.width=photo_sort.cell_size+'px';
$('drag_proxy').style.height=photo_sort.cell_size+'px';
drag_proxy.select_num=photo_sort.selected_index.length;//���ô�����ѡ��ͼƬ������
if(drag_proxy.select_num>0){
var drag_img=photo_sort.photo_list[photo_sort.selected_index[drag_proxy.select_num-1]];
drag_proxy.src=drag_img.src;//��ѡ�е�ͼƬ�����һ����Ϊ���������"����"
photo_sort.drag_flag=true;
$('drag_proxy').style.display='block';
}
//cell_gap:ͼƬ����,first_gap:��һ��ͼƬ���ⲿdiv����
var wrap_width=avalon($('wrap')).width(),wrap_offset=$('wrap').offsetLeft,first_left=$('wrap_photo0').offsetLeft,
second_left=$('wrap_photo1').offsetLeft,first_gap=first_left-wrap_offset,cell_gap=second_left-first_left;
photo_sort.col_num=Math.round((wrap_width-2*first_gap+(cell_gap-photo_sort.cell_size))/cell_gap);
for(var i=0;i<photo_sort.col_num;i++)//��һ��ͼƬ���ÿ��ͼƬ��������x�����ֵ��Ϊ�ָ�㣬���ӵ���Χ�б�
photo_sort.sort_array.push(first_gap+cell_gap*i+photo_sort.cell_size/2);
var target=this.parentNode;
avalon.bind(document,'mouseup',function(e){
onMouseUp(target);
});
if(isIE)
target.setCapture();//��ie���϶�˳��
e.stopPropagation();
e.preventDefault();
}
}
�����£�ѡ�е�ͼƬ�����ֳ���,�����Ƕ�������`.photo_maskon`
<div class='photo_mask' ms-class-photo_maskon='drag_flag&&selected_index.indexOf($index)>-1'
ms-mousedown='start_drag($event,$index)'></div>
mousemove
drag_move:function(e){
if(photo_sort.drag_flag){
var xx=e.clientX,yy=e.clientY,offset=avalon($('wrap')).offset();
var offsetX=xx-offset.left,offsetY=yy-offset.top;
photo_sort.sort_array.push(offsetX);//�ѵ�ǰ���λ�����ӵķ�Χ�б�
photo_sort.sort_array.sort(function(a,b){//�Է�Χ�б�����
return parseInt(a)-parseInt(b);//תΪ��ֵ����,��������'1234'<'333'
});
//��������ķ�Χ�б����ҳ���ǰ���λ�õ�index,��Ŀ��λ��ˮƽ�����index
var x_index=photo_sort.sort_array.indexOf(offsetX),y_index=Math.floor(offsetY/(photo_sort.cell_size+20)),
size=photo_sort.photo_list.size();
photo_sort.x_index=x_index;
photo_sort.target_index=photo_sort.col_num*y_index+x_index;//Ŀ��������ͼƬ�е�index
if(photo_sort.target_index>size)//Ŀ��λ��Խ��
photo_sort.target_index=size;
photo_sort.sort_array.remove(offsetX);//�Ƴ���ǰλ��
$('drag_proxy').style.top=avalon(window).scrollTop()+yy-photo_sort.cell_size/2+'px';
$('drag_proxy').style.left=xx-photo_sort.cell_size/2+'px';
}
e.stopPropagation();
}
����˵��
- ���ڵ�ǰ�϶�����λ���ж�
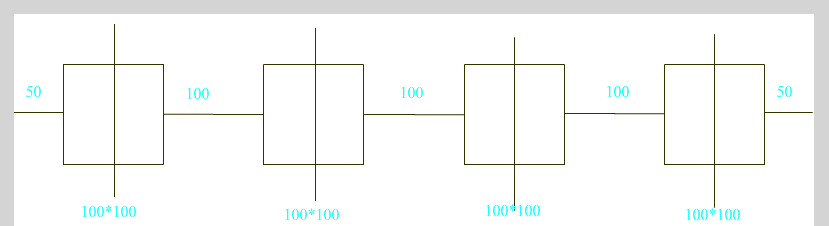
ͼ��ÿ����Ԫ������ߣ���ˮƽ����ѵ�Ԫ���Ϊ���ߡ�ÿ�����߰�һ�з�Ϊ5���֣��жϵ�ʱ����굱ǰ��`e.clientX`��5�����������һ���֡�
- �������жϵ�ʱ������������ģ���ÿ�����ߵ�x����͵�ǰ���λ�õ�x���걣�浽���飨�����`sort_array`��,�ź���Ȼ��`indexOf`����ǰ���λ�õ�x�����������е�λ�ã����ɵõ���ǰ�϶���Ŀ��λ�á�
�����������Ļ��������������
var target;
if(x>50+50){
if(x>3*100+3*100+50+50){//���һ����
target=4;
}else{
target=(x-50-50)/(50+100+50);
}
}else
target=0;
- ����ɾ����ǰ���λ�õ�x���꣬�ճ�λ�ã�������һ��mousemove�¼���x���ꡣ
- ���ڵ�ǰ�϶���Ŀ��λ�����ҵ�ͼƬ����һ��ƫ�ƣ��Ǿ��Ƕ�Ŀ��λ�����ҵ�ͼƬ������Ӧ��class.
.prev{
 right: 40px;
}
.next{
 left: 40px;
}
 <div id='wrap' ms-controller='photo_sort'>
 <ul class='justify' ms-mousemove='drag_move($event)'>
  <li ms-repeat='photo_list' ms-attr-id='wrap_photo{{$index}}' ms-class-prev='$index==target_index-1'
  ms-class-next='$index==target_index'>
  ...
  </li>
  <li class='justify_fix'></li>
 </ul>
 </div>
������Ҫע�⣬�������϶�����������ұ�ʱ�����ڲ�����`inline-block`,��ʱĿ��λ�������е���һ�У�����У������һ����Ԫ�����һ�У�����У��ĵ�һ����Ԫ��Ҳ�ᷢ��ƫ�ơ�
������������ñ���`x_index`,��ʾ��Ԫ����x�����index.������ƫ��class��ʱ�������ж�����
<li ms-repeat='photo_list' ms-attr-id='wrap_photo{{$index}}' ms-class-prev='$index==target_index-1&&x_index>0'
ms-class-next='$index==target_index&&x_index<col_num'>
...
</li>
mouseup
function onMouseUp(target){
if(photo_sort.drag_flag){
for(var i=0,len=photo_sort.selected_index.size();i<len;i++){//����ѡ��ͼƬ
var item_index=photo_sort.selected_index[i],data=photo_sort.photo_list,
target_index=photo_sort.target_index,temp;
if(item_index<target_index){//Ŀ��λ����ѡ��ͼƬ֮��
temp=data[item_index].src;
for(var j=item_index;j<target_index;j++)
data[j].src=data[j+1].src;
data[target_index-1].src=temp;
}else{//Ŀ��λ����ѡ��ͼƬ֮ǰ
temp=data[item_index].src;
for(var j=item_index;j>target_index;j--)
data[j].src=data[j-1].src;
data[target_index].src=temp;
}
}
photo_sort.target_index=-1;//�������ã���ʼ��
photo_sort.sort_array=[];
photo_sort.col_num=0;
photo_sort.x_index=-1;
photo_sort.selected_index=[];
$('drag_proxy').style.display='none';
photo_sort.drag_flag=false;
avalon.unbind(document,'mouseup');
if(isIE)
target.releaseCapture();
}
}
������Ҫ���Ƕ�ͼƬ�б������š�
- Ŀ��λ����ѡ��ͼƬ֮ǰ
�Ȱ�ԭʼͼƬ������`temp`,Ȼ��Ѵ�Ŀ��λ��ͼƬ��ԭʼͼƬǰһλ�õ�ͼƬ�����κ���һ��λ�ã�����`temp`�ŵ�Ŀ��λ�á�
- Ŀ��λ����ѡ��ͼƬ֮��
�������ֻ࣬���������ǰѴ�Ŀ��λ��ͼƬ��ԭʼͼƬ��һλ�õ�ͼƬ������ǰ��һ��λ�á�
ע��
������`data[j]=data[j+1]`������ֵ����Ϊavalon��֧�ֵ���ת�����������£���Ҫ��������VM���¸���һ���µĶ���Ҳ���Ƕ���һ��arr,Ȼ���ͷ��ʼ����������model,���`photo_sort.photo_list.clear()`ɾ������ͼƬ��`photo_sort.photo_list=arr`���¸�ֵ��������ͼ��
���
��ʵ�ϣ�google plus��ϸ���ϻ�����
- ��ѡͼƬ
- ����й����������϶�λ�ÿ�Ҫ������ǰ���棬���������Զ����ƻ����ơ�
���������žͲ����ˣ�ԭ��Ҳ�Ǻܼġ�
���ĵ�ַ��http://www.45fan.com/bcdm/52126.html